Tuesday, May 19, 2020

Day 65, The Costco Rotisserie Chicken, or How you can eat for a week


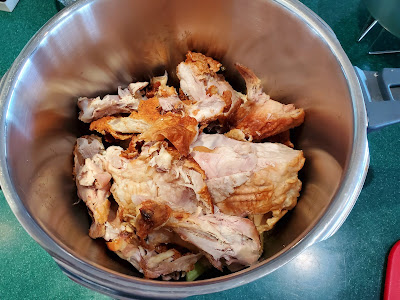
What's the first thing you smell as you walk towards Costco?  It's not the wagon wheel pizzas at the food court, it's the whirling rotisserie chickens that they turn out faster than you can buy them. Costco sells about 100,000 of them per day and about 90 million a year.  At $4.99, it's a loss leader for them, but for me, it's almost a week's worth of dinners.  The first dinner is cutting up the chicken and serving it with a green salad.  Next day, cut off all the usable meat and make chicken stock with all the leftovers.  If you have an Insta-pot and/or a pressure cooker this is where they shine.  In less than an hour, you will have rich chicken stock.  That stock can be the basis for a chicken pot pie, or soup or stew.
The usable leftover meat is turned into chicken salad for lunch, and then into curried chicken or chicken pot pie with lots of veggies. You can add the meat to pasta for a chicken alfredo, or chicken tacos, or fajitas. 
I realize that if you have a family of 4, you will probably just get 3 meals out of this, but Dr. C. and I can get a few more since there are only two of us. 
Making stock in your Insta-pot or pressure cooker is where these machines really prove their worth.  Here's my recipe, it's flexible, if you want to add different vegetables or no veg, you will still get 4 cups of the best chicken stock you've ever had.

Pressure Cooker Chicken Stock
You can also use a turkey carcass to make turkey stock during the holidays---make sure to break down the carcass so it fits into the pot!

1 chicken carcass, cut into pieces
1 onion, skin on, cut into quarters
3 ribs celery, coarsely chopped
3 medium carrots, coarsely chopped
3 cups water
a few peppercorns

Put all the ingredients into the pot, cook on high pressure for 40 minutes.
Leave the skin on the onion, it gives the soup flavor and color
Break up the bones as much as you can


WMF Pressure cooker---workhorse in the kitchen
                               Allow a natural pressure release, remove the top, and strain the stock.
I usually get about 4 to 5 cups of stock, depending on the moisture of the veg and amount of meat left on the chicken
Allow to cool, cover and refrigerate for up to 5 days, or freeze for up to 6 months.

A few notes, I don't salt the broth or add herbs to it, but you can do that.  I'd recommend your favorite dried herbs---thyme and/or sage are good choices.  Fresh herbs will be destroyed under pressure, so I recommend adding them in at the end of the cooking time if you want them.  
This recipe will work in an Insta-Pot (it's basically a pressure cooker) or an electric pressure cooker.  Click here for a link to The Easy Pressure Cooker Cookbook.  

It's day 65, and I'm headed into the kitchen to deal with some leftover halibut for dinner.  I hope that you all are safe, and well.


Monday, May 18, 2020

Day 64, Just For the Halibut, Quarantine Kitchen


It's wild Alaskan halibut season and I'm in!  Halibut is my favorite fish, it's big, flaky, and tastes like chicken, what's not to love?  Right now you can find it in your local market; warning, it will be expensive, but you only need 4-ounce portions, so a pound will feed four easily.  The meat is thick fleshed and cooks up in a 400-degree oven in about 10 to 12 minutes.  My favorite way to make this is to top it with some fresh breadcrumbs mixed with Parmigiano Reggiano, a bit of lemon zest, basil and Italian parsley.  I keep the breadcrumb mixture in the freezer so I can grab it and use it on lots of things like my Nonna's stuffed tomatoes in the summer. The bread crumb mixture is a great way to get rid of stale bread, too. 
This recipe applies to all thick fleshed fish, like salmon, or sea bass.  We had Chino farms' corn for dinner the night before, so I stripped the leftovers off the cob and sauteed them in a bit of butter, and chives.  Perfect accompaniment. 

   The 10-Minute Halibut
Serves 6

8 slices sourdough or other firm bread torn into pieces---baguettes have too much crust
2 garlic cloves
1/4 cup grated Parmigiano Reggiano 
1 teaspoon grated lemon zest
6 leaves fresh basil
3 sprigs fresh Italian parsley
1/4 cup unsalted butter, melted
2 tablespoons fresh lemon juice
1/4 cup extra virgin olive oil
1 teaspoon Old Bay seasoning (optional)
2 1/2 pounds halibut fillets

Preheat the oven to 400 degrees, and line a baking sheet with aluminum foil.  
Put the bread, garlic, cheese, zest, basil, and parsley into a food processor and pulse on and off to bread up the bread into bread crumbs.  Transfer to a bowl, and toss with the butter.  
Combine the lemon juice, olive oil, and Old Bay if using.  Paint the fish with the mixture on both sides.  

Mound the bread crumbs on top of the fish, and bake for 10 to 12 minutes, until the fish registers 155 degrees on an instant-read meat thermometer, and the thickest part inside is opaque.  Allow the fish to rest for 5 minutes before serving.  

I had a little more than 1 1/4 pounds and we have enough for another dinner tonight---I'm thinking I may make fish burgers out of it, but the day will tell what I do with it.  

As we ease into another week here in San Diego, we are having some work done on our patio cover, and so there is a bit of hammering and drilling going on.  We are hoping for paint by Thursday.  Please stay safe, stay well, and stay home.  

Sunday, May 17, 2020

Day 63, Red Sauce Italian, Quarantine Kitchen

 
Quarantine has seen us drinking a bit more wine, and an addiction to this drink the Aperol Spritz.  It's refreshing, bubbling, and great at the end of the day (or anytime, really)  I first had this when our British friends made one for us in their rental villa in Spello.  Since then, whenever we have one, we toast our friends and thank them for their inspiration.   
My roots are from Umbria in the center of Italy, and I tend to cook what I know, mainly Italian foods.  But there is a sub-genre here in the US that I refer to as "red-sauce Italian".  You know what I'm talking about, it's the funny little pizzeria that sells some pasta with a ton of red sauce on the top and baseball-sized meatballs, or that place in your neighborhood that bills itself as an Italian restaurant, but you'd never find any of the food they serve in Italy. Let me state here, that these places are fine if you recognize what they are---but don't say that it's Italian food---it's kind of like the people who go to Vegas and stay at the Venetian and then say that they don't need to go to Venice. 
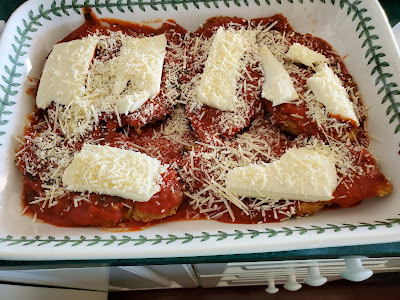
That leads me to our dinner the other night, Chicken Parmigiana.  In the 20+ years, we have been going to Italy I've never seen this on the menu in Italy, EVER.  But it's comfort food, simple to make ahead, and then pop into the oven.  This one made enough for a crowd, we ate it for dinner, and I had two other casseroles that I sent home to friends.   So if you embark on this journey, just know that you can have another in the freezer, or you can share.  As always, know your audience, if you have a gang of big eaters, this will serve 6 to 8 easily. 

Chicken Parmigiano
Serves 6 to 8

For the Sauce
3 tablespoons extra virgin olive oil
1 garlic clove, minced
1/2 cup finely chopped onion
two 28-ounce cans tomato puree, or chopped tomatoes and their juice
salt and pepper
1/4 cup finely chopped basil
1/4 cup finely chopped Italian parsley

In a Dutch oven, heat the oil, add the garlic and onion, and saute until the onion begins to soften about 3 minutes.  

                       Add the tomatoes, season with salt and pepper, and simmer for 30 minutes.  

                                    Add the herbs, and season with salt and pepper.  Set aside.  


The sauce can be refrigerated for up to 5 days, or frozen for up to 6 months.  
This sauce will give you enough to sauce the chicken, if you would like to use it for saucing pasta on the side, make 1 1/2 times the amount.  

For the Chicken and Assembly


3 large eggs
2 tablespoons water
salt and pepper
4 chicken boneless skinless chicken breasts
3 cups panko crumbs
1 cup grated Parmigiano Reggiano or Pecorino Romano
1 teaspoon dried basil
1 teaspoon dried oregano
Vegetable Oil for frying
8 ounces whole milk mozzarealla, sliced
1/2 cup shredded Parmigiano Reggiano or Pecorino Romano

In a mixing bowl, whisk otgether the eggs, water, salt and pepper.
Put the chicken on a cutting board, and slice horizontally into 3 portions each.  Transfer to the egg mixture.  
In a shallow dish, combine the panko, cheese, basil and oregano.  
Dip the chicken into the panko mixture and transfer to a 13-by-9-inch pan, repeating with the remaining chicken.  Refrigerate for at least 1 hour.  
Pour 2 inches of vegetable oil into a large skillet, and heat to 325 degrees.  Fry the chicken until just golden brown on each side, drain on paper toweling.  


Coat the inside of a 13-by-9-inch baking dish with non-stick cooking spray.  
Spread a thin layer of the sauce into the pan.  Top with the chicken.  Spread some of the sauce over each piece of chicken, top with some of the mozzarella and sprinkle the entire casserole with the shredded cheese.  
There are 6 pieces in here, you should have a total of 12 pieces, so you'll need another casserole dish

At this point, the casserole can be refrigerated for up to 24 hours, or frozen for up to 2 months.  
Preheat the oven to 350 degrees, cook uncovered for 25 to 35 minutes until the cheese is melted, and the sauce is bubbling. 
Serve with pasta, risotto or focaccia.  

I realize there are a few steps to making this, but it all comes together, and you've got a great meal for your family.  If you can't find fresh herbs for the sauce, use 1/3 the amount of dried herbs.  
Today is day 63, not sure what is happening in California tomorrow, I believe there will be some opening up, but still shelter in place.  We are so fortunate to have enough food, we are well and our family is safe.  That's all we can ask for at this point.  Stay safe, stay well, and stay home if you can.  

Tuesday, May 12, 2020

Day 58, Quarantine Kitchen, The Cannoli Cake


I realize that many of you are not celebrating while in quarantine, and I get it; kids home from school, staying home, and facing those 4 walls when you could be out doing what you normally do, wearing a mask to protect yourself and others.  It all gets old pretty fast, we are a society that wants instant gratification....I want this over as much as the next guy, but I also realize that we need to be careful and need to safe.  I'm fine with staying home and following the guidelines. 
That said, I thought it would be fun to share a cake that I love, and one that is a big, bold taste of celebration.  Chocolate cake layered with cannoli filling topped with mascarpone cream and then surrounded by filled cannoli.  The best part of this is that the cake should be made and filled the day before to let the cannoli filling seep into the cake layers, then fill the cannoli just before serving, and stand them around the cake.  When this shelter in place is over, this is the cake to make.  The layers can be made now and then frozen until you are ready. 

Cannoli Cake


For the Ricotta Cream
3 cups heavy cream 
2 cups whole milk ricotta 
2/3 cup sugar 
1 teaspoon vanilla paste or extract 
2 cups shaved semi-sweet chocolate 
1 cup chopped chocolate or sprinkles 
1/2 cup chopped pistachios 
 8 large or 16 small cannoli shells 

1.      Beat the heavy cream until stiff peaks form.  Add the ricotta, sugar, vanilla and shaved chocolate.  Refrigerate until ready to use. 


For the Cake and Frosting
2 cups granulated sugar
1 3/4 cups unbleached all-purpose flour
3/4 cup Dutch-process unsweetened cocoa powder
1 1/2 teaspoons baking powder
1 1/2 teaspoons baking soda
1 teaspoon salt
2 large eggs
1 cup whole milk
1/2 cup vegetable oil
2 teaspoons vanilla extract
1 cup boiling water


1.      Preheat the oven to 350° F. Coat two 9-inch baking pans with nonstick cooking spray. 
2.      In To make the chocolate cake, in a large bowl, stir whisk together the granulated sugar, flour, cocoa, baking powder and soda, and salt. Stir in the eggs, milk, oil, and vanilla. With an electric mixer, beat on medium speed for 2 minutes.  Stir in the boiling water and mix until blended, about 2 more minutes. Divide the batter evenly equally between the prepared pans and bake until a skewer inserted in the center comes out clean, 30 to 35 minutes.
3.      Place the pans on a rack and let cool for 10 minutes. Remove the cakes from the pans and let cool completely on the racks.
4.      Do-Ahead: At this point, you can refrigerate for 2 days or freeze for 6 weeks. Defrost before continuing.
Mascarpone Frosting
2 cups heavy cream
1 1/2 cups mascarpone cheese
1/2 cup granulated sugar

To make the filling, in a large bowl, beat the cream until stiff peaks form.  Add the mascarpone and sugar and beat until smooth. 

TO ASSEMBLE:

1.      Lay one layer onto a cake platter and spread a layer of the ricotta cream mixture.  Top with the next layer and frost the top and sides with the mascarpone Frosting.  At this point, the cake can be refrigerated for up to 24 hours. 


2.      Before serving, fill the cannoli shells with the remaining ricotta cream, dip one end in crushed pistachios, and the other in chopped chocolate.  Stand them upright around the outside of the cake.  Sprinkle the top of the cake with pistachios or chopped chocolate.  When serving, cut a wedge of cake, and top with a cannolo. 


Looking forward to being able to see our friends, and celebrating coming out of this quarantine safe and well. Stay safe and stay home.

Wednesday, May 6, 2020

Day 51, If It's Tuesday it Must Be Chicken

Monday, San Diego mandated masks when out and about.  Making these was fun, but being dyslexic, everything gets a little more complicated.  I can't stress enough that these masks aren't for me, we wear them for you so that you won't get sick if we have the virus but are asymptomatic.
As we headed into Tuesday, it was going to get hot here at the coast, in the 80's by Wednesday.  I spent the morning doing some cleanup, then tried to decide what to have for dinner.  Since I've been cooking a lot, the choices have to make me happy (see sourdough) The recipe I decided on was a garlic Dijon chicken sandwich that our son-in-law had made last summer when we were visiting them in Connecticut.   You can marinate the chicken in the morning, make the dressing, and then grill at night.  It's really simple, and the results are awesome.
The original recipe, which I've tweaked considerably, was published in Bon Appetit magazine---they described the dressing as "Caesar-ish"--- no, Caesar doesn't have basil or Dijon mustard in it.  So there's that.

Grilled Dijon Garlic Chicken Sandwiches
Serves 4
I served these are brioche buns, but potato rolls would be fab as well.  

6 boneless skinless chicken thighs, trimmed of fat
salt and pepper
1/4 cup Dijon mustard
1 tablespoon Worcestershire sauce
3 garlic cloves, minced
3 tablespoons fresh lemon juice
1 teaspoon lemon zest
1/2 cup extra virgin olive oil
1/3 cup mayonnaise
1/2 cup finely chopped basil or Italian parsley
1/4 cup finely chopped cornichons
3 cups thinly sliced romaine lettuce 
Brioche buns for serving

Season the chicken with salt and pepper, and put into a zip-lock bag.  
In a mixing bowl, whisk together the mustard, Worcestershire, garlic, lemon juice, zest, and oil.  Pour 1/2 of the mixture into the zip-lock bag with the chicken, seal the bag, and refrigerate for at least 2 hours or up to 12 hours.  
Whisk the mayonnaise, basil and cornichons into the remaining marinade, cover, and refrigerate.
Remove the chicken from the fridge and remove from the marinade.  Preheat the grill or a grill pan, and grill the chicken for 3 to 4 minutes per side, until the chicken is cooked through.  

Allow the chicken to rest for 5 minutes, covered with aluminum foil.  Thinly slice the chicken.  
Toss the romaine with some of the dressing, mound some of the salad onto a bun.  

                             Top with some of the chicken, and additional dressing if desired.  

You can definitely add vine-ripened tomatoes, and sliced onion to this, as well.  It was a lovely dinner with a side of fresh pineapple, which, by the way, are amazing right now, so when you are at the supermarket, pick up a pineapple.  The dressing would be good on its own as a dressing for potato or pasta salad, or as a dip for fresh veggies.  The marinade would be delicious as a marinade for salmon, or lamb.  
So, it's Wednesday, day 52, and I think today since it's going to be quite warm here at the coast, we will try and get in another walk on the beach.  I'm kind of tired of the neighborhood walk, so it's off to the beach for us, social distanced, wearing a mask, and enjoying the sand.  
Stay safe and stay well.


Tuesday, May 5, 2020

The End of Sourdough

So 49 days ago, I began the sourdough journey, today it ends with Garlic Knots.  I've fed this thing, made sure it was happy, and yet, the results from my travails have been mixed at best.  So, tonight we had a steak dinner, and I made the garlic knots.  I let the dough rest overnight in the fridge, allowed it to rise forever (just a quick note, you will be waiting for sourdough forever---the rise is the thing)
I'm not one to weigh the dough, I eyeballed the amount I needed

Roll out about 4 to 5-inches

Tie the knot
 After letting them rise yet again, I drenched them in garlic butter, and topped with grated Parmigiano.
These were just OK, not a lot of sourdough flavor, and not my fave.  Give me focaccia anyday!.

I think my bottom line was I felt like I was wasting so much flour on a dead-end for me.  Sourdough is something people either get into and treat as a religious experience or they do what I did, experiment, and find that it isn't soul-satisfying.  I had spread the starter onto a silpat and waited for it to dry---which it didn't.  It is now a thing of the past, and I'm fine with that.   
So, it's a new week, and we are out of Aperol for spritz's, so I think that calls for a swing through Costco to pick up a few more bottles.  Remember to wear a mask and to stay safe and stay well.
This is why I wear a mask:  Wearing a mask protects others in case you’ve contracted the virus & don’t know it yet or are asymptomatic. It’s an act of kindness & caring for others, especially essential workers, to wear one in public.

50 Days, Kitchen Quarantine, Shrimp Burgers

Yesterday we hit day 50; local beaches are opening up for exercise only.  No sitting on the beach, observe social distancing and wear a mask.  San Diego has done a pretty good job at trying to keep the rate of infection down, testing needs to ramp up so that people can get back to work. 
Dr. C. and I headed over to Del Mar to walk the beach.  It was glorious if you ignored the red tide and dead fish on the beach.  The seagulls were taking care of the fish, but the odor from the red tide is something we can smell at our house a mile away.  Most people on the beach were observing social distancing, there were surfers and waders, and most people had a mask. 
I tend to hit a wall with cooking most days, looking for something fun, and something that will use up my freezer stash.  I had some suspect (read that kind of freezer-burned) raw shrimp in the freezer, got them out, and made some shrimp burgers which were awesome.  Add a brioche bun, and a little remoulade slaw and it was a great dinner.  I cooked the burgers in butter on the stove top, rather than grilling them, and I think they turned out really well.  My fear with grilling is that they will overcook, or fall apart, losing half of the burger in the coals. 
I think you could ramp up this recipe to feed a crowd, I just made huge burgers for two--they will not shrink, like a regular burger, so make them the size of your brioche bun. 

Day 50 Shrimp Burgers
Makes two large burgers

1 pound large raw shrimp, peeled and deveined
juice of 1 lemon
1 teaspoon Old Bay seasoning
1/4 cup mayonnaise
2 teaspoons Worcestershire
1 teaspoon grated lemon zest
1 teaspoon Dijon mustard
1/2 teaspoon garlic powder
2 shakes Old Bay seasoning (this is probably 1/8 teaspoon)
1/4 cup panko crumbs
2 tablespoon unsalted butter
1 teaspoon extra virgin olive oil
Brioche buns for serving

Put the shrimp into a bowl, add water to cover, add the lemon juice and Old Bay and allow to sit in the water for 10 minutes.  (you are brining the shrimp, in my case, I was hoping that the bits of freezer burn wouldn't affect the flavor of the burger, and they didn't---freezer burn turns parts of the shrimp white)
Drain the shrimp, put into a food processor, add the mayonnaise, Worcestershire, zest, mustard, garlic powder, Old Bay and Panko. 
Pulse on and off until the shrimp are ground up and the mixture comes together. 
Shape the mixture into patties, and refrigerate for 1 hour to firm up. 
Melt the butter and oil over medium heat, cook the burgers for about 3 minutes, until the underside is a pinkish/golden brown.  Flip the burger (you may need two spatulas to do this)  Cook another 4 minutes until the underside is pink/golden brown.  Serve on toasted brioche buns. 

Remoulade Slaw
Remoulade is one of my favorite sauces, for the burgers I made the sauce and then tossed some of it with thinly sliced romaine lettuce since I didn't have cabbage.  I served the remaining remoulade on the side.  

¾ cup mayonnaise
1/4 cup Dijon or Creole mustard
2 tablespoons ketchup
1 tablespoon finely chopped cornichons or dill pickles
2 teaspoons finely chopped shallot
1 teaspoon prepared horseradish
2 teaspoons finely chopped capers
1 tablespoon chopped fresh Italian parsley
½ teaspoon sweet paprika
3 cups thinly sliced romaine or cabbage (or slaw mix)

In a mixing bowl, combine the mayonnaise, mustard, ketchup, pickles, shallot, horseradish, capers, parsley, and paprika.  
Toss the romaine with some of the dressing, and serve with the shrimp burgers.  Serve the remaining sauce on the side.  

These burgers were so big, they broke when I put them on the buns


As we head into the week, I'm not sure what will be next in the kitchen, but I confess that I did get rid of the sourdough starter, as I opined this weekend, it's not for me.  Stay safe and stay well.  


Saturday, May 2, 2020

Day 47, The Last Days of Sourdough or the $200 Loaf

So, for the last 6 weeks, I've been feeding a sourdough starter, that I thought would be fun, and something to occupy my time.  Boy was I wrong about the fun part!  I'm not a baker, I don't care about weights of flour and the temperature of liquid when it is mixed into something.  All that is for the scientists of the culinary world, and that is not me.  I've so far made 2 loaves of sourdough bread, and 2 batches of sourdough focaccia.  Neither has blown my socks off, and the traditional yeasted doughs that I've made have been so much more fun to make and to eat.  I guess I'm just not a sourdough girl.  So, I've taken the starter, and spread it on a Silpat, and will let it dry, and I'll keep it stored in the freezer till I get the bug again.  Anyone in San Diego who wants a healthy starter, I'm your girl, just don't ask me what to do with this.
Once I got into reading about sourdough, which I thought would be fun, and simple, I realized that, no, this was a long term love affair, that I was not ready for.  Since all I have is time on my hands I started reading recipes and watching videos and the terminology and the equipment are beyond my capacity to get into this full bore.
First of all, the only flour you can seem to find these days is all-purpose, and the true sourdough-ers that I've read say it's the Anti-Christ.  If you can't use some leprechaun hand-milled bread flour, you are just making Wonderbread.  And, if you started that sourdough starter with all-purpose flour, then what you have isn't authentic enough for the purists. Give me a break---life is short, get on with it. Today I decided to take one more crack at this, I took some starter to make a recipe from this guy using all-purpose flour, he seemed to realize that no one could make his recipes since there isn't much bread flour to be found---it was almost like he was lowering his standards. 
So I started with the ingredients weighed in grams (don't get me started on that) and made a nice dough.  The instructions say to cover it for "bulk fermentation"---looks that up---oh, just let it do its thing.  He takes the temperature of the starter, water, dough, at each step.  I'm sorry, who said this was fun?  This is a pain in the you-know-what.  And, if you get into this, you need a myriad of equipment to complete one loaf of bread:  proofing baskets, a bulk fermentation container, Dutch ovens, a lame (aptly named) to mark the dough, parchment, and other accouterments that make this one loaf of bread a pretty pricey loaf.  I'm done.  I've got the dough in to its bulk fermentation, I will probably not make a loaf out of it, I saw a recipe for garlic knots and that has intrigued me, so we'll see what happens.
When I think of my Nonna and her bread baking on Fridays to share with her family, she didn't weigh anything, she just mixed the dough together, let it rise, and then voila, bread for the week.  OK, it wasn't sourdough, but it was sublime.
I don't want to scare you away from making sourdough,The Perfect Loaf is a good place to learn, but the terms are confusing, and you get an amazing amount of starter once you get going. It will sometimes blow off the top of your container. The sourdough-ers that I've read online wax poetically about how feeding their starter is almost a religious experience, they fall in love with it each day.  I'm just not there, and  I don't want to waste any more flour on something that I probably won't do again for a while.  I'm actually having a lot more fun making focaccia using yeast and making dinner rolls that are also delicious slider rolls.
As I've said before, I'm not a baker, it's not part of my DNA; I find the science fascinating, but I'm really a one-bowl cake, and cookie girl.  A reporter once asked me what was the thing I wouldn't have in my house, and I said a dessert that took so many steps to prepare that by the time I got to eating it, I was not interested.  It's the same way with sourdough, for me, I'd rather make a yeasted dough that gives me an amazing result.  Cooking should be fun, it should make you happy, and teach you something.  My sourdough lesson is that I've made it, and it was OK, but I'm not sure I'm going there again.   I'll be back with the garlic knots or whatever I decide to make later.  Stay safe and stay home.