Saturday, December 19, 2020

Quarantine Baking: Marble Chocolate and Tres Leches Cake


There is so much sugar, flour, and butter flying around my kitchen it's hard to keep track of what I'm making at any given time.  So far I've made about 5 trays of toffee, and lots of cookies, I've got a panettone biga rising, and dried fruit stewing in Amaretto, and then I stumbled upon a recipe that I thought would be delicious, a chocolate, dulce de leche, vanilla loaf cake. The recipe came from a respected baker who has written award-winning cookbooks, and I followed the recipe, and it was a waste of the ingredients --- the cake was dry and had no flavor at all, and it was a loaf---who wants to eat a loaf?  Give me a bundt or layer cake anytime.  So I set about transforming this recipe, I wanted a  flavorful cake that was moist, and I got it.  It really doesn't need frosting, a dusting of powdered sugar will work, but a little more dulce de leche can't hurt.   

Chocolate Marble Dulce de Leche Cake

Makes one 9-inch bundt

2 ounces bittersweet chocolate
2 ounces unsweetened chocolate
1 cup unsalted butter, softened
1 1/4 cups granulated sugar
3 large eggs
1 cup sour cream
1 tablespoon vanilla paste or extract
1 3/4 cup all-purpose flour
3/4 teaspoon baking soda
3/4 teaspoon baking powder
1/4 teaspoon salt
1/3 cup dulce de leche

Melt the chocolates in the microwave at 50% power, or on the stovetop over medium-low heat, and allow to cool.  
Preheat the oven to 350 degrees, and coat the inside of a bundt pan with non-stick cooking spray.
In the bowl of an electric mixer fitted with the paddle attachment, beat together the butter and sugar until light and fluffy.  Add the eggs one at a time, until they are combined.  Add the sour cream and vanilla, beating to combine.  (the mixture will look curdled)
Add the flour, baking soda, powder, and salt, and beat until smooth.  
Divide the mixture in half, and beat the chocolate into one half and the dulce de leche into the other.  
Spread the chocolate into the pan, top with the dulce de leche, and using an off-set spatula, draw the spatula through the batters to create a marble effect.  
Bake for 50 to 60 minutes, until a skewer inserted into the middle of the cake, comes out clean.  
Let cool on a rack for exactly 10 minutes, then turn onto the rack to cool completely.   

A few notes:  
  • The Bundt pan I used is gorgeous when the cake is turned out, but difficult to cut into attractive slices.  
  • There is no vanilla marble component in this cake like the original because really, who needs vanilla when you've got chocolate and dulce de leche?  You could divide the batter into 3 equal parts, and then have chocolate, vanilla and dulce de leche.  
  • The basis for this cake came from a cake in the book Baking for Friends which is a terrific cookbook.  
  • Remember when you spread the first layer into the pan, that will be the layer that you will see when you turn out the cake---you can reverse the chocolate and dulce de leche if you would like.  
  • This cake will freeze beautifully for about 6 weeks.  


Chocolate layer going in---I have to be honest, I just eyeballed the amount

                                                                     Dulce de leche
Swirled


You can just see the marbling down the center


As I said at the beginning, this really doesn't need a frosting, but a drizzle of dulce de leche over the bundt would give it a lovely look.  I hope that you are all enjoying some holiday cheer (read that strong cocktails) as we wait out this virus and its devastation.  We are just grateful to be safe and well, and wish you a holiday season filled with comfort, joy, and good health.  Buon Natale!

Tuesday, October 27, 2020

Autumn in San Diego, Time for Pork Braised with Apples and Cider


 70 degrees feels like fall here in San Diego after the very hot, humid weather we have been experiencing into October.  I never thought I'd get tired of wearing sandals and tank tops, but I've been jealous of my friends on the East Coast in their new sweaters, and boots.  One of my favorite dishes in cool weather is one we had in Normandy, France, pork braised with apples and cider.  I usually serve this over buttered noodles, but you could serve it over mashed potatoes, or polenta.  It's a great slow cooker recipe, but you can also make it on the stovetop in a Dutch oven.  


Pork Braised with Apples and Cider
Serves 6

1/4 cup Dijon mustard
1/4 cup firmly packed brown sugar
Six one-inch-thick loin pork chops (bone-in or boneless---the bones fall off in cooking)
2 tablespoons extra virgin olive oil
1 large sweet yellow onion, thinly sliced
2 teaspoons dried thyme
4 Honey Crisp apples, peeled, cored, and cut into 8 wedges
1 1/2 cups apple cider
2 beef bouillon cubes, or 2 teaspoons Better Than Bouillon beef base
1/3 cup heavy cream (this is optional, but really rounds out the flavor)
2 tablespoons cornstarch mixed with 1/4 cup water
salt and pepper
1 pound wide egg noodles, cooked al dente for serving

  1. In a small bowl, stir together the mustard and sugar.  Spread it onto the pork chops, this is a messy business, but it works. 
  2. Heat the oil in a Dutch oven, and brown the pork chops on both sides.  Remove the pork chops to a plate, and add the onion, thyme and apples to the pot.  Saute until the onions are translucent.
  3. Add the apple cider and bouillon cubes.  
  4. Return the pork to the pan, cover, and cook over medium-low heat (at a simmer) for 1 1/2 to 2 hours, until the pork is tender.  
  5. Add the cream and the cornstarch mixture.  Bring to a boil, and taste for seasoning.  
  6. Serve the pork over buttered noodles, mashed potatoes or polenta.  
Slow-Cooker Savvy: 
Saute through step 3, then transfer to the slow cooker insert.  Cook on high for 4 hours, or on low for 8 hours.  Add the cream and cornstarch, cook on high for 30 minutes, on low for 1 hour, till thickened.  

Brown the pork chops

Saute onions

Saute apples and thyme
Add the cider, bouillon, and pork to the pot


Add the cream and cornstarch

I served this with sauteed spinach

So I still have no idea what day it is, but I do know that crisp fall days are a welcome relief after hot and humid weeks.  I'm wearing a sweater today, which feels cozy, and the daytime temperature will probably be 70, but it feels like fall!  

I've finally gotten out into the garden to whack away some of the milkweed which feeds the monarch butterflies.  We are hoping they are on their way to Mexico, and we'll see them back here in the spring. 
The wildfire season has been devastating combined with the pandemic, right now we are praying for our friends in Orange County evacuating from the fires that exploded yesterday. 
Stay safe and stay well.  


Saturday, October 17, 2020

Cornmeal Biscotti, Quarantine Kitchen

 So, I still don't know what day it is, but I do know that I went to Trader Joes' the other day and picked up a small packet of cornmeal biscotti.  Now, I know, I should make these myself, but I really wanted to see what they tasted like and whether I would even like them.  They were your standard hard-as-a-rock biscotti, with a little bit of a sandy cornmeal texture, and not many identifiable nuts.  But, it got me thinking that for what I paid for these 12 biscotti I could be manufacturing 100's of them them in my own kitchen.  
Today was another hot day here in San Diego, so weird for October.  
Normally we see the ocean and the freeway here, but tonight we are fogged in

I'd made a batch of Marcella Hazan's broccoli potato soup for dinner but really wanted to try to make some biscotti, my way.  I trolled the internet for some ideas, and this recipe is a winner, thanks to David Leibovich and his wonderful blog.  I did adapt it a bit since I like a more buttery taste, and I used my favorite nuts, pistachios.  I think these would be great with an addition of dried cherries, or cranberries for the holidays, and pecans would be a nice sub for the pistachios.  

Quarantine Cornmeal Biscotti
Makes about 40

5 tablespoons salted butter, melted
1 cup sugar
1/4 teaspoon salt
2 large eggs
1 teaspoon vanilla extract
1 teaspoon lemon paste (or 1 teaspoon lemon extract) 
1 1/2 cups all-purpose flour
1/2 cup stone-ground yellow cornmeal
1 teaspoon baking soda
1 cup chopped salted pistachios

Preheat the oven to 350 degrees, and line a baking sheet with silicone or parchment paper. 
In a bowl, combine the butter, sugar salt, and eggs, until combined. Add the extract and lemon paste.  
Add the flour, cornmeal, baking soda, and pistachios.  
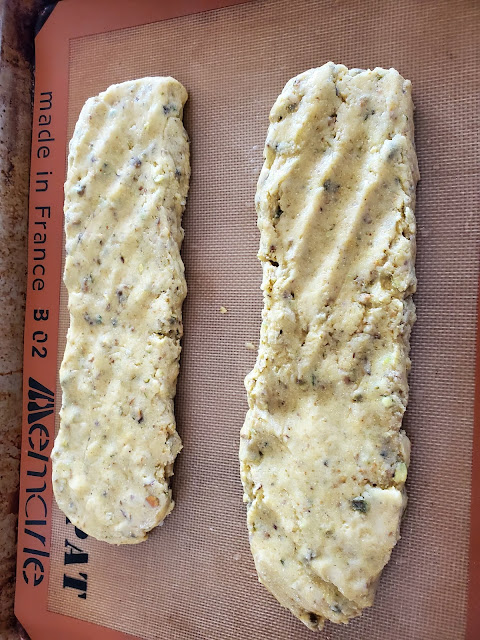
Shape the dough into two logs about 13-inches long.  (they will expand in the oven)

They don't look like much, but they expand in the oven
Bake for 20 minutes until set.  
Reduce the oven temperature to 250 degrees, and allow the logs to rest for 20 minutes.  

Cut the logs into 1/2-inch cookies, and arrange on the baking sheet --- I like to follow my friend Lora Brody's way of doing this and standing them upright.  Bake for 15 minutes until golden brown.  
The biscotti will keep in an airtight container for 2 weeks, or you can freeze them for up to 2 months.  

So, a few notes here, if you wish to add dried fruit, about 1/2 cup will work well.  A drizzle of bittersweet chocolate would also be spectacular on these once they are cooled.  I've been using salted butter for cookies lately, and the difference is really interesting---deeper flavor for chocolate chip cookies, and vanilla cookies.  These also benefitted from the salted butter.  If you only have unsalted butter, use 1/2 teaspoon salt, rather than the 1/4 teaspoon.  
What is Lemon Paste, you ask?  

Neilson and Massey who make my favorite vanilla paste, have come out with a lemon paste, a combo of zest and extract---use it as you would extract, you'll get a nice punch of flavor.  I have used this in cakes, and these cookies, and am sold!  
So, we are into October, and Dr. C. and I have canceled our trip to Maui at Thanksgiving---I'm not whining, we are just sad for our country and the number of people who are sick and have died. Please wear your mask, stay safe, stay well and VOTE.   

Saturday, October 10, 2020

Quarantine Wonton Soup, Still Don't Know What Day It Is


Several weeks ago, the website Eater wrote about a company delivering freshly made Chinese dumplings to your door.  It didn't take me long to order a variety of gyoza, and wontons.  
The pork gyoza were delicious, we ate them too fast for me to photograph---let me stop here and say, I salute all the bloggers out there, who can style their dishes, and take the perfect photo before digging into the dish they've been craving all day---I'm not there.  Half the time, the dish is 1/2 eaten, and we try to mash it back together again.
Anyway, when looking into the refrigerator last night I saw I had some forgotten baby bok choy, and the remains of a Costco chicken, so I decided to make wonton soup for lunch, using the Hong Kong-style shrimp and pork wontons that we had ordered. The result was awesome, so I thought I'd share it. Above are the frozen Hong Kong wontons---Hong Kong-style are made with an egg noodle, a little richer than the plain wontons made with flour and water.

Quarantine Wonton Soup


Serves 6
6 wontons per person---this is a guesstimate
1 tablespoon sesame oil--plus more for garnish if desired
2 garlic cloves, minced
1 teaspoon grated ginger
2 baby bok choy, thinly sliced
8 cups chicken broth
2 cups cooked shredded or chopped chicken (optional)
1 tablespoon soy sauce

Bring 6 quarts of salted water to a boil, and keep on a simmer. 
In a Dutch oven, heat the oil over medium-high heat, add the garlic, ginger, and bok choy and saute till the bok choy is wilted.  


Add the chicken broth, chicken (if using), and soy sauce.  

Simmer for 15 minutes.  
Cook the (frozen) wontons in the salted water for 4 minutes.  Using a slotted spoon, arrange 6 wontons in each soup bowl, and ladle in the soup.  Garnish with a drizzle of sesame oil if desired.   

So the verdict: a winner!  I will order these little guys again---we still have a couple of bags (they come with about 30 in each bag) and the flavors are fresh and delicious.  If you are in LA or San Diego in their delivery zone, this is a great option.  
I usually don't cook Asian or Mexican because there are so many great Asian and Mexican options here, but since we aren't eating out yet, I can certainly fill in with these guys delivering to my front door.  
Stay safe, stay well, and wear a mask.  


Sunday, October 4, 2020

Hottest Day of the Weekend, It's Time for Minestrone


So while the rest of the nation is apple picking, and raking up fall leaves, here in San Diego we are experiencing record heat.  Fortunately, for now, no fires are burning in our area.  

I still have no idea what day it is, and I spend days trying to decide what I'm going to cook, and there are days when I don't cook and we simply order in or grab something from the freezer.  Yesterday I felt like having a bowl of comfort, even though it was 90 degrees here at the coast.  I've been using Insta-Cart to get most of our groceries, and Gelson's markets have had stellar produce, so I put in my order and 2 hours later I have the veg I needed to make some soup.  

I kind of picture this soup being made by Tony Soprano, or one of the guys from Goodfellas, or the God Father movies when they are holed up somewhere for a while.  This soup and a pot of sauce with meatballs. 

 During hot weather like this, my slow cooker is a God-send.  I use it for soups, braises, and as a low and slow oven.  At high, a slow cooker should be at 300 degrees, so you can slow bake foil-wrapped potatoes, or make lasagna.  

In Italy, minestrone really is a vegetable soup, that may have a few leftover beef or pork bones thrown in for flavor, but they hardly ever use stock to enrich the broth, rather they will use Parmigiano rinds, fruity olive oil to begin the soup, and fresh veg to flavor the soup.  I threw all that out the window yesterday, I started with sweet Italian sausage, added wine, and tomatoes, and both beef and chicken broth because I wanted a really hearty soup.  So, here goes.


Quarantine Minestrone

Serves 6 to 8

1 pound sweet Italian sausage, either bulk or removed from casings
1/2 cup finely chopped onion
3 ribs celery, coarsely chopped
3 medium carrots, coarsely chopped
1 teaspoon dried sage (I've also used chopped rosemary in this)
1/2 cup dry red wine
One 14.5-ounce can crushed tomatoes
3 cups chicken broth
3 cups beef broth
3 medium zucchini, diced
2 cups green beans, trimmed and cut into 1-inch pieces
2 cups chopped spinach (I've subbed kale, or Swiss chard in here if it's looking good)
One 14.5-ounce can either small white beans, or garbanzo beans, drained and rinsed
1/2 cup chopped Parmigiano Reggiano rinds
1/2 pound small pasta, such as pennette, orzo or small shells, cooked al dente
salt and pepper
extra virgin olive oil for garnish
1/2 cup shredded Parmigiano Reggiano for garnish

In a Dutch oven, cook the sausage, until it is no longer pink, and break up any large pieces.
Add the onion, celery, carrots, and sage, and saute until the onion begins to soften, about 5 minutes.  

Add the wine and tomatoes, and simmer for 3 to 4 minutes to concentrate the flavor.  

Add the broths, zucchini, beans, spinach, beans, and rinds.  Bring to a boil, and simmer for 3 hours.  


Add the pasta, season with salt and pepper.  Serve drizzled with olive oil, and sprinkle with cheese if desired.   
The soup keeps refrigerated for up to 4 days or freezes beautifully for up to 4 months.  
Slow-Cooker Savvy:  Saute the sausage and mirepoix.  Add the tomatoes and wine, then transfer to your slow cooker insert, add the broths, veg, and rinds, cook on high for 3 hours or low for 6 hours.  


A few notes on this soup:  
  • If you want to make it vegetarian, leave out the sausage, and use vegetable broth
  • I've made this using cauliflower as one of the veg (about 2 cups of florets), it's really a soup that is from the garden so whatever you have will be fine in it.  
  • Sub in Kale or Swiss chard for the spinach.  
  • Always cook the pasta (if you are using it) before it goes into the soup, otherwise, it will absorb all the broth.  I've also used cheese tortellini in this soup and it's delicious.  
As the day winds down, I pray you are all well and safe.  Wear your mask, and keep social distancing.  Ciao for now.  

Sunday, September 27, 2020

What to Do With Leftover Corn


Living a few miles up the hill from the Chino Farm Vegetable Shop, I'm blessed to be able to enjoy their corn when it's in season here.  With climate change, the season was a bit late, but the corn, as always is the best on the planet.  Even with just 2 of us here at Chez Phillips, I usually buy a dozen and then cut the kernels off the cob and use them for cottage pie, corn chowder, and yesterday for a quiche-like dish that we enjoyed with a salad for dinner.  You can make this vegetarian by omitting the bacon, but why would you?  The bacon gives it a nice smoky quality, with a little texture, which makes each bite delicious.  Other ideas, sub in leftover grilled seafood or chicken for the bacon, and change up the cheese---I think it would be great with any cheese, but I had some suspect sharp white cheddar that I needed to use, so that's what was in this one, but I think you could use Parmigiano, Asiago, Monterey Jack (or pepper jack and omit the basil) a lovely French Mimolette, or even Havarti with dill.  Feta or flavored goat would work as well.  I prefer the sharp cheeses for their contrast with the sweet corn.  

Chino Farm Sweet Corn Quiche
Serves 6

6 strips thick-cut bacon
1/4 cup finely chopped onion
2 cups corn cut from the cob (in winter buy frozen and defrost it)
6 large eggs
1/4 cup heavy cream
salt and a few drops Tabasco or Frank's hot sauce
2 tablespoons finely chopped basil
2 cups shredded sharp white cheddar cheese 

In a skillet, cook the bacon until it is crisp, remove all but 1 tablespoon fat, and saute the onion and corn for 2 to 3 minutes until the onion is softened.  Set aside to cool.  


In a mixing bowl, whisk the eggs, heavy cream, salt, and pepper, until blended.  Stir in the cooled corn mixture, cheddar, and basil.  


Preheat the oven to 350 degrees, and coat the inside of a 9-inch pie plate with non-stick cooking spray.  
Pour the mixture into the pie plate, and bake for 35 to 45 minutes until set in the center.  Allow to rest for 15 minutes before cutting into wedges, and serving.  This can be a main course, side dish, or breakfast casserole.  


This dish can actually be frozen; bake for 30 minutes, the center will still be a bit jiggly, cool completely, wrap airtight, and freeze for a month. To reheat, preheat the oven to 325 degrees, cover the quiche with aluminum foil, and bake for 20 to 25 minutes until an instant-read meat thermometer registers 155 in the center.  Let the quiche rest for 10 minutes before cutting.  
I still don't know what day it is, but I can enjoy the beauty that surrounds us here and be grateful.  Wishing you all a joyous day.  

Tuesday, July 28, 2020

Baseball is Back, I Still Don't Know What Day it is, so It's Ballpark Food

Baseball is back; albeit with empty stadiums, or those filled with cardboard cutouts behind the plate and down the right and left side of the fields.  My favorite has been the Korean baseball teams that had stuffed animals in the stands---
I've got a crush on these Teddy bears, check them out on FB or Instagram. 
So, having a sports writer for a son, and a dad who dragged us to every brand of sports in Boston, you join in.  As a kid, my dad would make us keep score so that he knew we were paying attention. 
For our dining pleasure on Sunday afternoon, while we were watching the Padres vs the Diamond Backs, I decided we could imitate being at the game and I'd make sausage and peppers.  This is a pretty simple dish, but it can go so wrong, with the wrong sausage.  Use Italian sausage for this, no breakfast links, or bratwurst or Andouille---it just doesn't work. 

Sausage and Peppers
Serves 6

2 pounds Italian sausage (I use sweet, as I'm not fond of spicy sausage in this)
1/4 cup water
3 tablespoons extra virgin olive oil
1 large sweet onion, like Vidalia---you'll need about 2 cups, thinly sliced
4 cups thinly sliced yellow, orange and red bell peppers, or Italian long frying peppers (see note 1)
1 teaspoon dried oregano
salt and pepper
1/4 cup tomato puree or chopped tomatoes (see note 2)
1/4 cup finely chopped basil
2 tablespoons finely chopped Italian parsley

Put the sausage and water into a microwavable dish, cover, and cut a few vent holes in the plastic wrap.  Cook for 5 minutes on high.  You can also do this on the stove top in skillet.  What you are doing here, is almost cooking the sausage through--it takes less time that doing them in a skillet on the stove top and the sausage is juicier.  
Preheat the grill or a grill pan, and grill the microwaved sausages, until they are cooked through, about 3 to 4 minutes, turning to brown evenly.  Set aside.
In a large skillet, heat the oil, add the onion, and saute until it begins to turn translucent.


Add the peppers, and oregano, season with salt and pepper. saute until the peppers are softened.  


Add the tomatoes, basil and parsley, and simmer for 10 minutes.  Add the sausages back into the pan, and simmer another 5 minutes.  


Season with salt and pepper, serve on soft Italian rolls and pretend you are in the stands cheering on your team.  
Cook's Note 1:  It can be difficult to find Italian peppers, they are long and thin, and authentic for these sandwiches, but they can be hard to find outside of a metropolitan area.  Here in San Diego, Specialty Produce has them in stock. They tend to cook up faster since they have a thinner skin.  If you can't find them, colored bell peppers work really well here, as you can see.  Don't use green peppers, the flavor just isn't what you want.  
Cook's Note 2:  At the ball park you might not get peppers with tomatoes, because they are making the peppers and onion on a flat top grill.  It's up to you whether you use the tomatoes or not---we like it this way, but it's really a personal taste decision.

So our team lost, and I decided that sausage and peppers was a bad luck lunch, but that doesn't mean that I won't make it again since it's summer and there is a baseball.  ⚾

Sunday, July 19, 2020

Whatever Day it is; Kitchen Quarantine, Old School Chocolate Chip Cookies

So, I confessed in another post that cookies are my downfall---given an empty house, I would eat every cookie I could find.  One of my favorite store-bought cookies is Tates' Bakeshop Chocolate Chip cookies.  These are crisp chocolate chip cookies, that stain your chin with buttery goodness.  
The recipe for these cookies in the Tate's Bakeshop Bakery Cookbook doesn't produce a crisp cookie---I've tried my darndest to get them there, but they don't get to that crispy consistency.  BUT, the good news, I've finally gotten their recipe to a point that I love them (which is unfortunate since I can't stop eating them). These cookies are thin, with a crispy edge, but a chewy center.  The other night I made them, and even our son, who is the chocolate chip cookie monster said they were my best effort ever.  Cook's Note here, we are more partial to milk chocolate chips in these cookies, but you can use semi-sweet or white chocolate in them if you prefer.  The other note is that using salted butter gave me a more flavorful cookie---go figure after years of culinary school, and teaching, it seems that salted butter in cookies has resulted in Nirvana.  

Chocolate Chippers
Depending on the scoop you use, this should make 36 to 48 cookies

1 cup salted butter, softened
3/4 cup packed brown sugar
3/4 cup sugar
2 large eggs
2 teaspoons vanilla paste or vanilla extract
2 cups all-purpose flour
1 teaspoons baking soda
8 ounces milk chocolate chips (I've used Ghirardelli and Guittard with great results)

  1. Preheat the oven to 350 degrees, and line baking sheets with silicone, aluminum foil, or parchment.  
  2. In the bowl of an electric mixer fitted with the paddle attachment, cream together the butter and sugars until smooth.  
  3. Add the eggs and vanilla, and beat till smooth. 
  4. Add the flour, baking soda, and chocolate chips, beating on low speed until just combined. 
  5. Using a portion scoop, or a tablespoon, form the dough into balls and place 2-inches apart on the prepared baking sheet.  
  6. Wet your hands, and press down on the cookies, bake for 10 minutes, reverse the baking sheets and bake an additional 2 to 3 minutes until the edges are golden brown, and the center are set.  
  7. Remove from the oven, and allow to cool on the cookie sheets for 5 minutes.  Transfer to wire racks to cool and store in airtight containers.  
  8. Cook's Note:  This recipe was adapted from the Tates Bake Shop Cookbook.
  9. If you only have unsalted butter, add 1 1/2 teaspoon salt to the recipe. 


So, I have no idea what day it is in our quarantine, but I do know that we are in, and when we go out we wear masks, and we social distance.  That is the only way we can flatten the curve.  After the 4th of July, I realized that we'd have 2 weeks till the next wave happened, and here we are in California, basically closed down again.  Stay safe and stay well.   


Monday, June 29, 2020

Getting Cheesy; No Idea What Day it is; Quarantine Kitchen

I know that's not cheese, they are blackberries, and I was fortunate enough to find some amazing blackberries this week, and then decided it was time to make a sauce out of them.  So, then I needed something to put the sauce on. 
I've been helping a family who lost a loved one, making a few Sunday dinners for them.  It's been therapeutic for me, and I hope it's taken the stress off of them.  When making these meals I want to make it as simple as possible, so the main just gets a heat up in the oven, and the desserts can just be served, so cheesecake it is.  This recipe was given to me when I was newly married, over 48 years ago, and it's been a keeper ever since.  I've made other cheesecakes, but this one is still my go-to.  Cheesecakes are magic, you get a smooth, creamy, delicious filling on top of a crunchy crust, and they can be frozen with no problem at all. 


Sour Cream Cheesecake Bars
Serves about 10
Graham Cracker Crust
1 1/2 cups graham cracker crumbs (about 18 whole crackers)
1/2 cup (1 stick) unsalted butter, melted
1/2 cup sugar
Preheat the oven to 325° F. Coat a 13 x 9-inch baking pan with nonstick cooking spray.
To make the crust, in a large bowl, combine the crust ingredients and press into the bottom and halfway up the sides of the dish.  Set aside.
Cream Cheese Filling
Three 8-ounce packages cream cheese softened
1 cup sugar
5 large eggs
1 1/2 teaspoons vanilla paste or extract

With an electric mixer, cream together the cream cheese and sugar in a large bowl until light and fluffy, about 4 minutes.  Add the eggs, one at a time, beating after each addition.  Add the vanilla and beat until the filling is smooth. Pour into the crust and bake until set, 35 to 40 minutes.

Sour Cream Topping
2 cups sour cream
1/4 cup sugar
1 teaspoon vanilla extract

Meanwhile, make the topping. In a small bowl, stir together the sour cream, sugar, and vanilla. 
When the cheesecake is done, remove from the oven and increase the oven temperature to 400° F.  Spread the sour cream mixture over the hot cheesecake and return to the oven for 5 minutes. 
Remove from the oven and immediately cut into squares. Let cool completely in the pan on a rack.
Do-Ahead: At this point, cover and refrigerate for at least 6 hours and up to 48 hours or freeze for up to 2 months.
Cook’s Note: Cutting the cheesecake while it’s hot is much easier than cutting it when it’s cooled and solid.  I recommend you do this with a chef’s knife or bench scraper and make one long cut down each row, wiping the knife after each cut. 


Blackberry Sauce
4 cups blackberries, washed and picked over for leaves
1/3 to 1/2 cup sugar
2 tablespoons cornstarch
1/3 cup orange juice

In a saucepan combine the ingredients, bring to a boil, and simmer for 5 minutes.  Cool and serve the sauce over ice cream, cheesecakes, or chocolate cake.  
As we begin another week, Dr. C. and I are staying home this week, I've stocked up on groceries, and snacks, and we won't go out except to take our walks.  He had his first cataract surgery last week, and this week we need to make sure that he has a negative Covid test on Sunday, so he can have his next surgery on Tuesday.  So staying home is our jam.  Stay safe, stay well, and wear a mask. 

Thursday, June 18, 2020

Quarantine Kitchen, Gaining the Covid 19


Cookies are my downfall; if they are here, I'm like Cookie Monster, I'll eat them all.  Which brings me to the Covid-19...those pounds we are packing on by baking and cooking enormous amounts of food.  Recently I've been on the lookout for a really delicious sugar cookie---I want a cookie I don't have to roll out, soft, chewy, buttery, and satisfying.  I've tried a few recipes, then ran across this one on the Cooks Illustrated website.  I made then once using unsalted butter, and they left me flat, so the next time I made them I used salted butter that was leftover from an early Costco run when they were out of unsalted butter.  These are my cookie; everything I was looking for, and I really can't stop eating them. They will make an amazing ice cream sandwich cookie, too.  That was my motivation for trying some recipes, I'd been to a restaurant in LA with our son who was doing a review, and the best part of the meal was the ice cream sandwich made with some amazing sugar cookies sandwiched with strawberry ice cream.  So with Father's Day around the corner, and July 4th coming up, these are the perfect cookies.  

Soft Sugar Cookies
Makes 2 dozen

1 cup salted butter softened
1 cup granulated sugar
1 tablespoon light brown sugar
1 large egg
1 1/2 teaspoons vanilla paste or extract
2 cups all-purpose flour
1/2 teaspoon baking powder
1/2 cup granulated sugar for rolling

Preheat the oven to 375 degrees, and line baking sheets with silicone, aluminum foil, or parchment. 
In the bowl of an electric mixer, beat together the butter and sugars until light and fluffy.  Add the egg and vanilla, and beat until the mixture comes together. 
Add the flour and baking powder, and stir until blended.  
Roll the dough into 1 1/2-inch balls, roll in the sugar, and place on the baking sheets about 2 inches apart.  

Using the bottom of a drinking glass, flatten the cookies, and bake for 7 minutes, reverse the baking sheets and bake an additional 7 minutes, until they are golden brown around the edges, and just set.  


Cool on the baking sheet for 3 minutes, then transfer to a wire rack to cool to room temperature.  
Cook's Note:  If you only have unsalted butter you will need 1 teaspoon of salt.  
I hope you are all safe and well.  Until next time, wishing you a great weekend.