Showing posts with label gifts from your kitchen. Show all posts

Thursday, December 15, 2016

Jamming


1 1/2 pounds thick cut bacon
I posted this photo on my Facebook page and as with most photos of bacon, I got a lot of requests to know what I was cooking.  So, I'm posting this short blog post to give you the recipe for some awesome bacon jam.  Even my friend in South Africa wanted to know what was I doing.  So here you are.

Bacon Jam

1 1/2 pounds thick cut bacon, cut into 1/2-inch pieces
1 large sweet yellow onion
1 garlic clove, minced (optional)
1/2 cup maple syrup
1/4 cup balsamic vinegar
1 tablespoon Creole mustard (or whole grain with a few drops of Tabasco)
1 tablespoon Worcestershire sauce
1 tablespoon sherry vinegar (see note)

In a large skillet, cook the bacon until crisp. (you can either leave all the drippings, or take out all but 2 tablespoons---I left them for flavor---it's a holiday, OK??)
Add the onion and garlic if using, and saute until the onions are softened, about 3 minutes.  
Add the syrup, balsamic vinegar, mustard and Worcestershire and simmer for 25 to 30 minutes (this will depend on the surface area of your pan---if it's a 12 inch pan, this will take about 25 minutes, smaller, will take about 40) until the mixture has thickened and is jam-like.
Taste and add sherry vinegar to taste---this will depend on your maple syrup---no maple syrup in containers shaped like women, please--that's NOT maple syrup.
Cool the jam, put into a food processor and pulse on and off for a more jam like consistency. Refrigerate for up to 1 week, or freeze for up to 1 month.  Delicious on burgers, sandwiches, and a cheese platter.

Beautiful and delicious!
Ciao for now.

Monday, December 5, 2011

'Tis the Season


 Every year at this time Chez Phillips smells like butter, sugar and chocolate; I'm making toffee.  A friend taught me this recipe years ago, and I continue to make it because my family and friends expect it, and it gets me into the holiday spirit. Yesterday I finished three batches; fortunately there are no tears in it, because the Chargers didn't play....they play tonight.  Although the recipe is simple, it takes some watching; allow yourself about 45 minutes for the first part...it can take longer, or it can be shorter, depending on your stove and ingredients.  I will give you a short list of do's and don'ts at the end. 

Christmas Toffee
Makes One 1/4 sheet pan

1 pound salted butter
3 cups granulated sugar
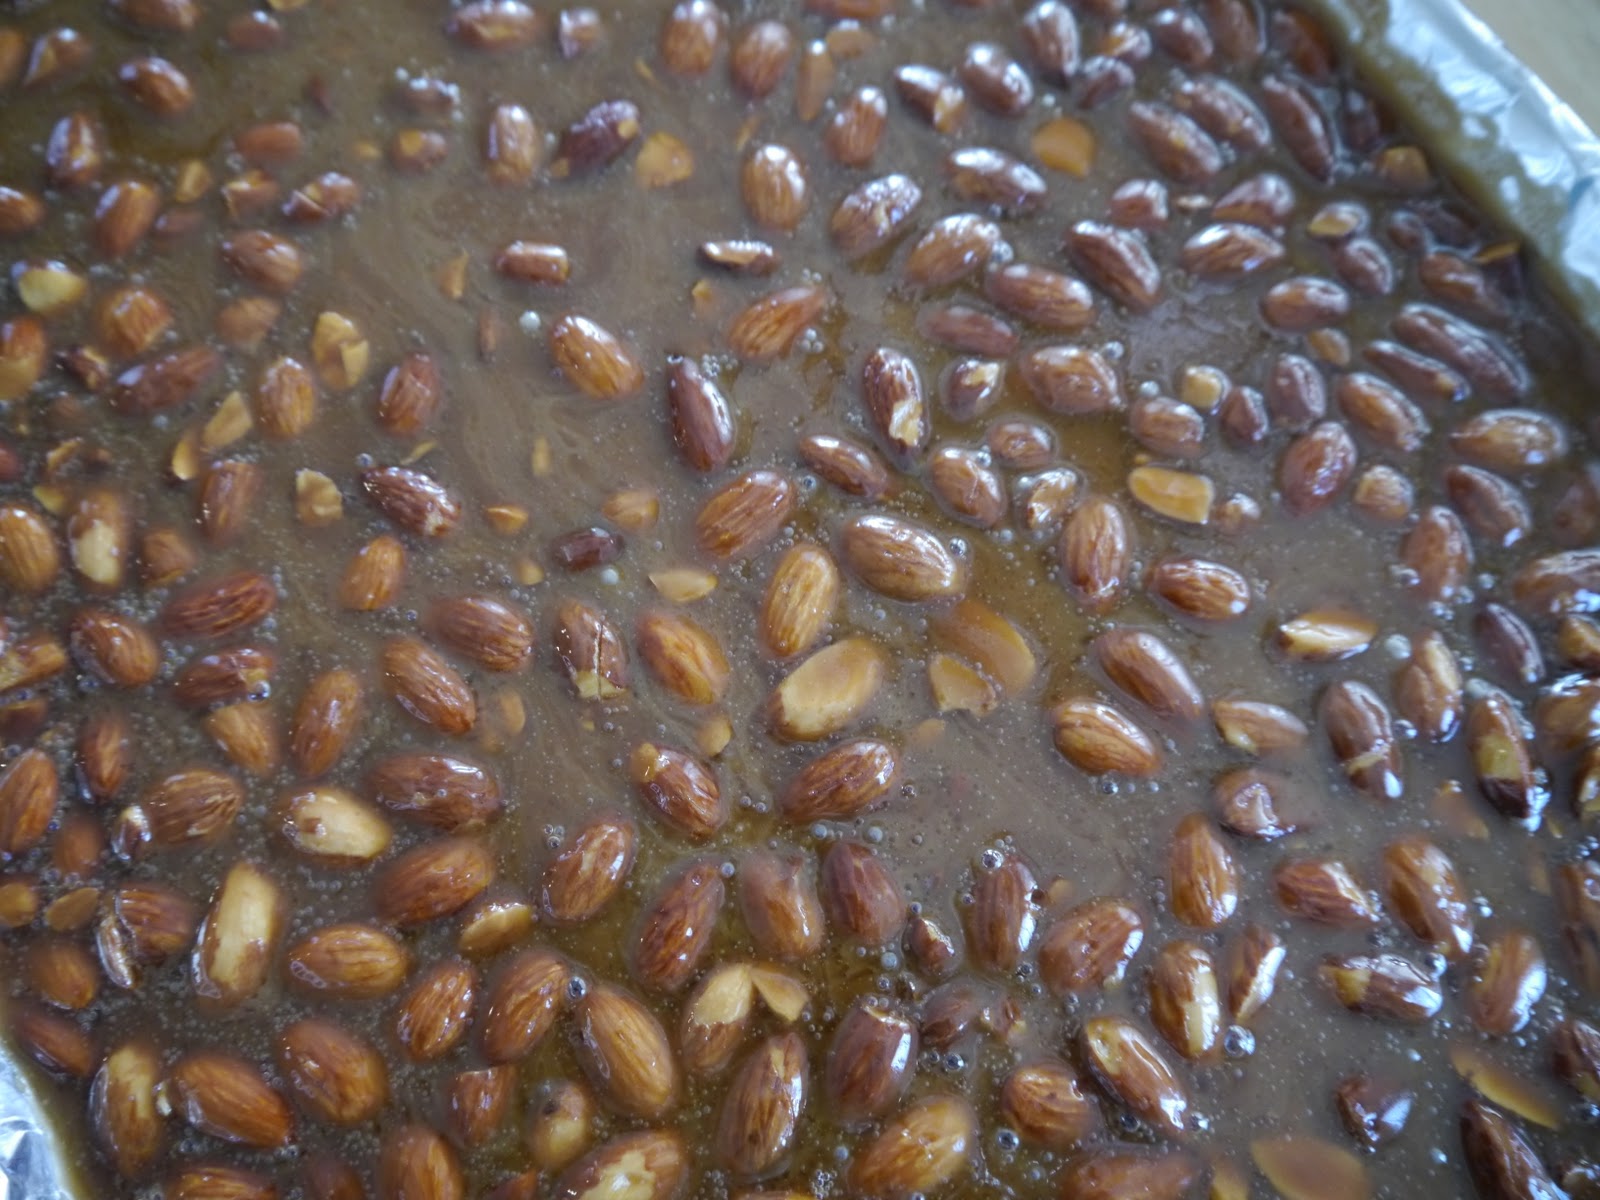
3 cups whole almonds
12-ounces semi-sweet or bittersweet chocolate (this is a matter of taste---I just don't recommend one of the high percentage of cacao chocolates or chocolate chips which are formulated not to melt)

Line a sheet pan with aluminum foil and set aside on a cutting board or heat proof pan.  
In a large microwaveable bowl, melt the butter.  Stir in the sugar and cook for 6 minutes on high.


While the butter and sugar are cooking chop 2 1/2 cups of the almonds and set aside.  Finely chop (in the food processor) the remaining almonds to fine dust and set aside.


 Cook the sugar and butter mixture an additional 6 minutes in the microwave; at the 4 minute mark, preheat a heavy bottom saucepan on the stove top over medium heat.  Using oven mitts, grasp the bowl, and pour into the preheated saucepan, and turn the heat up to medium high (this will vary with the stove)  Stir the mixture constantly---it may separate, but keep on stirring.  The toffee will turn a dark caramel color, at this point, stir in the almonds (sometimes this will bring the separated mixture together, but don't give up!) and continue to stir until the mixture comes together and is a dark amber color.
Pour the hot mixture into the sheet pan, and allow to cool.

Allow the pan to cool, then clean with HOT water to get off any excess hardened toffee. 
When the toffee is cooled, melt 6 ounces of chopped chocolate (I used Scharffenberger) either on the stove top in double boiler, or in the microwave (about 2 minutes)  spread over the top of the toffee in an even layer and sprinkle with some of the almond dust.


Wait until the chocolate has set (depends on the heat of your kitchen--2 to 6 hours) and turn the toffee out onto another sheet of foil.


Melt the remaining chocolate and sprinkle with the dust.  Wait until the chocolate is completely set before breaking into pieces.  I use a clean table knife and a meat pounder to chisel it into pieces.  Wrap in airtight containers and give as gifts. 


Do's and Don'ts

  • Use aluminum foil, parchment will melt
  • Use a silicone spoon to stir, wooden spoons tend to take on flavors from other dishes, and silicone stands up to the heat
  • Use a heavy bottom, 3 to 5-ply stainless steel pan (non-sticks tend to add water to this)
  • Use high quality chocolate; I use Scharffenberger, but Lindt, Ghirardelli and Guittiard will all work here
  • Never fill the hot pan with cold water after your spread the toffee into the sheet pan; it will ruin even the most expensive pan (how do I know this you ask---experience is a painful teacher!) 
  • There are a myriad of containers to use here, simple food safe plastic bags decorated with seasonal stickers, fancy tins, paper boxes---you can find these at The Container Store, Michael's, or your local gourmet retailer and this year I'm shopping local to support small businesses.  
I'll be back tomorrow with some dynamite cookie recipes, because that is next on this Elf's list!

Thursday, November 4, 2010

Mixing it Up


In keeping with our dried soup mix theme that I began earlier in the week, here's a great formula for making a terrific bean soup mix, and giving it to your friends.  Recycled glass Mason jars or vacuum seal jars make a nice presentation or you could pack the beans into cellophane bags, and arrange the bag into the bowl of a soup ladle or for a larger gift, a soup tureen.  If you decide the go the larger gift route, add a bread mix, or cake mix to enhance the "basket" whatever it may be.  Make sure to buy your beans at a health food store, or natural product store from bins; old beans in bags at the supermarket will take forever to cook. 

Hill o' Beans Soup Mix
Makes 10 two cup packages

1/2 pound small white beans
1/2 pound Great Northern beans
1/2 pound kidney beans
1/2 pound red beans
1/2 pound soy beans
1/2 pound garbanzo beans
1/2 pound yellow split peas
1/2 pound green split peas
1/2 pound dried brown lentils
1/2 pound red lentils
1/2 pound baby Lima beans
1/2 pound black eyed peas
1/2 pound pearl parley
24 crumbled chicken bouillon cubes
2 tablespoons chili powder
3 tablespoons garlic salt
20 sun dried tomatoes, crumbled
10 bay leaves
Stir all the beans together in a large mixing bowl, or stock pot.  In a separate bowl, mix together the chicken bouillon, chili powder, garlic salt,tomatoes and bay leaf.  Measure out 2 cups of beans into gift packages, seal airtight.  Accompany each package of bean soup with 1 tablespoon of the dry spice mixture.  Store in airtight containers with a 2 month expiration date.

Hill o' Beans Soup
Makes about 2 1/2 quarts

1 package Hill o' Beans Soup Mix
2 quarts water
1 smoked ham hock
One 15.8-ounce can chopped tomatoes and their juice

In a Dutch oven, wash the beans and cover with water to soak overnight.  Drain the beans and add 2 quarts of fresh water, the dry ingredients, ham hock and tomatoes.  Bring to boil, cover and simmer for 3 to 4 hours, or until the beans are tender.  Remove the ham hock from the soup, and chop the meat from the bone, return the meat to the soup, remove the bay leaf, and serve the soup. 

I'm on my way to DC this afternoon, but hope you have a lovely day filled with joy.  I'll be back this weekend with a few more goodies for you to try.  Enjoy your day!

Wednesday, November 3, 2010

More Cookies


Today I was given some really delicious biscotti from a friend, and thought that biscotti make a great gift from your kitchen.  You can dress up the gift by putting the biscotti into a coffee mug, and adding chocolate spoons for stirring, and a 1/2 pound of Italian Roast Coffee.
These biscotti are addictive, with their bittersweet chocolate notes, off set by salted almonds and milk chocolate chunks.  I usually make several batches, and they freeze beautifully if you want to get a head start on your holiday baking. 


Chocolate Almond Biscotti


Makes 40


2 Cups all-purpose flour
½ cup Dutch processed cocoa powder
1 Tablespoon instant espresso powder
½ teaspoon baking powder
¾ teaspoon salt
½ cup butter, salted, room temperature
½ cup sugar
½ cup dark brown sugar, packed
2 eggs
1 teaspoon vanilla extract or vanilla paste
1 cup chopped dry roasted salted almonds
1 cup milk chocolate chips


Preheat oven to 350 degrees. Line the baking sheet with parchment or silicone pan liner.

Sift together flour, cocoa powder, espresso powder, baking powder and salt.

In a large mixing bowl, beat butter and sugar till light and fluffy.
Scrape down bowl; add eggs, one at a time. Add vanilla and beat till light and fluffy again, approximately 2 minutes. Scrape down bowl.
Add flour mixture slowly, mixing till combined.
Add chopped nuts and chocolate chips. Mix till just combined.
Divide dough in half and roll each piece into a 12-inch cylinder. Pat down cylinder to 1 inch thick and 2 inches wide.
Bake for 30 minutes.
Remove baking sheet from oven and let cool at least 15 minutes. You can let them cool for hours at this point if you run out of time and continue later, or you can freeze the cooled logs for a later date.
With a long serrated knife, cut each log into ¾ slices. Stand slices onto prepared baking pan, 1 inch apart. Cookies can lie down flat onto the baking sheet, but I feel you get a nicer bake upright.
Bake 15 to 20 minutes more. Cookies should not be soft.
Remove to wire racks to cool completely, store in airtight containers for up to 2 weeks at room temperature or freeze for up to two months. 
Adapted from Tate's Bake Shop Recipe of the Month

I'll be teaching tonight at KitchenArt in West Lafayette, IN, and then heading to Bloomington tonight and on to the East Coast tomorrow.  The temperature here this morning was 29 degrees, so I'm off to find some woolie things to wear, wish me luck!  Enjoy your day, I'll be back tomorrow with more.

Saturday, October 30, 2010

Cast Iron Corn Bread


Cast iron skillets are usually passed down from cook to cook, but the newest cast iron by Lodge is pre-seasoned and oh-so easy to clean, and cook with.  This skillet would make a great "basket" to give with a corn bread mix, to your friends or family. 


If you elect to give a less expensive gift, consider a jar, or burlap sack lined with a plastic bag to hold the mix.  A jar of jam, or homemade honey butter makes a nice addition to the basket, too. 


Southern Cornbread Mix
Makes about 2 3/4 cups

1/2 cup dried buttermilk powder (Saco or King Arthur Flour)
1 2/3 cups white cornmeal
1 teaspoon baking powder
1 teaspoon baking soda
1 teaspoon salt
  1. Stir the ingredients together in a mixing bowl.
  2. Transfer the cornbread mix to an airtight container and label with a 1 month expiration date.

Southern Cornbread

Makes one 10-inch round

2 tablespoons butter, melted
One bag Southern Cornbread Mix
2 cups water
1 large egg, beaten

  1. Preheat the oven to 400 degrees.  While the oven is preheating, place the butter into a 10-inch cast iron skillet, glass or ceramic pie plate, and melt the butter in the oven while you prepare the batter.
  2. Place the cornbread mix into a large mixing bowl. 
  3. Make a well in the center, add the water and egg, stirring until blended. 
  4. Pour the batter into the hot skillet, and bake for 17 to 20 minutes, until a toothpick inserted into the center comes out with a few crumbs on it.  Serve the cornbread warm with butter, and honey or homemade jam.
I'll be back on Monday with a few more ideas for your gift giving; until then, enjoy Halloween. 

Friday, October 29, 2010

More Gifts from your Kitchen


You've seen them in boutiques, and gourmet stores; those lovely soup mixes in bags tied with raffia, or layered in jars.  Most cost about $10, but you could make several on your own for a fraction of the retail cost.  This is a great way to get your kids involved in gift giving this holiday season; even a two year old can measure beans, or lentils or split peas.
How you choose to wrap yours is up to you--sometimes I will layer them in a plastic bag, tie with raffia, and then set the mix into a soup ladle, and tie it to the ladle with additional raffia.  Or, I will layer the ingredients in a jar, cover with scrap fabric that I've cut with pinking shears, and attach the recipe to the ribbon.  The empty jar can be reused by the recipient after the soup is made (maybe for leftovers).  This soup is especially colorful as well as delicious when it's made.  I urge you to buy your beans from bulk bins in health food or natural grocers; they are generally fresher, and you can buy what you need.


Confetti Split Pea Soup Mix
Makes about 3 1/4 cups

1/2 cup yellow split peas
1/2 cup red lentils
2 cups green split peas
5 chicken bouillon cubes, crumbled
1 teaspoon dried thyme
1 bay leaf
  1. Layer the ingredients in the order given into a 3 1/2 cup jar, or stir the ingredients together and store in an airtight container. 
  2. Label with a 3 month expiration date.  I like to attach a small bottle of Tabasco to the jar or bag.
Confetti Split Pea Soup
Serves 6

2 tablespoons olive oil
1 large onion, finely chopped
2 medium carrots, finely chopped
2 ribs celery, finely chopped
One package  Confetti Split Pea Soup Mix
6 cups water

  1. In a large stock pot, heat the olive oil, and saute the onion, carrot and celery until softened, about 3 to 4 minutes. 
  2. Add the soup mix, and stir to coat the peas.  Add the water, bring to a boil, and simmer, covered for 1 1/2 to hours, until the peas have split.  
  3. Season with salt and pepper if necessary, remove the bay leaf and serve. 


Of course, this gift could be part of a larger basket, with a bread mix (tomorrow) and a dessert mix if you want to round it out a bit more. Think about giving this in a stock pot, or a bean pot, for a more generous gift. I'll be back this weekend with a few more ideas for gift giving, until then, enjoy your weekend.


Wednesday, October 27, 2010

Gifts From Your Kitchen

Don't groan, but with less than 2 months till Christmas, it's time to make your list and check it twice.  This is a year where many of us are looking for ways to make nice gifts for friends, that don't involve a lot of time, or money, and have I got a deal for you.  


For the rest of this week, I will be posting recipes for great mixes to make to give as gifts to your friends and family.  Combine two or three in a basket, or give one as a hostess gift, or to your neighbors.  You can be as creative as you'd like, I'll just be your coach, and feel free to e-mail me and let me know how you are doing---photos of you and your family/friends making mixes are always welcome here!


Sugar Cookie Mix
Makes about 3 1/2 cups

1 cup sugar
2 1/2 cups flour
1 tablespoons vanilla powder
1 teaspoon baking powder
Mix all the ingredients together and store in an airtight jar or container.  Label with a 2 month expiration date.  If you don't include the vanilla powder, make sure to add 1 tablespoon vanilla extract to the ingredients in the recipe card.

Recipe Card:

Awesome Cut Out Sugar Cookies

One package Sugar Cookie Mix
1 cup unsalted butter, softened
1 large egg, lightly beaten
2 tablespoons milk
1 cup sifted confectioners' sugar

In a large bowl, cream the butter until smooth, add the Sugar Cookie Mix, egg, and milk and beat until the mixture begins to come together.  
Shape the dough into two balls, and flatten slightly.  Wrap each in plastic wrap, and refrigerate for 2 to 3 hours, until firm.  
Preheat the oven to 400 degrees and line baking sheets with silicone liners.  
Sprinkle the rolling surface with some of the confectioners' sugar.  Using one half of the dough, roll it out about 1/8-inch thick, and cut into 2-inch shapes with seasonal cookie cutters.  Place the cookies 1-inch apart on the baking sheets and bake for 7 minutes, until lightly browned on the edges. Cool for 2 minutes on the baking sheets, and remove to wire racks to cool completely.  Repeat with the second 1/2 of the dough, until all the cookies are baked.     

Frosting

Makes about 6 cups
6 cups confectioners' sugar
2/3 cup unsalted butter, softened
1 tablespoon vanilla paste or extract
1/4 cup milk as needed to thin the frosting

In the bowl of an electric mixer, beat the sugar and butter together until smooth.  Add the vanilla and dribble in enough milk to make the frosting spreading consistency.  Divide the frosting into 3 or 4 bowls, and tint the bowls with food colors of the season, and keep one white.  Fill pastry bags, and pipe the frosting onto cooled cookies. 


I picture giving this gift in a variety of ways; one would be to present the mix in a basket with cookie cutters, sprinkles, and edible decorations for the season.  Another way is to give the mix in a jar, and tie a cookie cutter to the ribbon on the jar, along with the recipe card.  For the pint-sized chef, you could make up a basket with an apron, chef's hat, small rolling pin, and all the things necessary to make these cookies. 
Whichever way you choose to give this gift, it will be one that will bring lots of joy to the family that eats these cookies.  


This is a basket I made last year for an auction; I did cheat, and used a pre-prepared cookie mix.  

There's a bit of food for thought---I'll be back on Friday or Saturday with another mix for you to tuck away in your recipe file, until then, remember that it's the thought that counts.  
If you are looking for more mix ideas here's a great book with lots of cooking and non-cooking ideas.